


Yoke Carry Technique — How to Move More Weight Faster in Strongman's Most Brutal Event
The yoke carry looks simple. Pick up a heavy frame, walk it to the end of the course, put it down. How complicated can it be?
Ask any strongman competitor who has had a yoke walk fall apart at competition weight — who has watched their carefully planned pace dissolve into a grinding crawl with the frame swaying on their back — and they'll tell you: the yoke is one of the most technical events in the sport. Not in the way that the log press or Atlas Stone is technical, but in the specific way that moving maximum weight efficiently requires more deliberate practice than most athletes give it.
This guide covers everything you need to know about yoke carry technique — setup, brace, stride mechanics, breathing, and the specific habits that separate athletes who move a yoke fast from athletes who fight it to the line.
Why the Yoke Carry Is Different From Every Other Strongman Event
Every other major strongman event involves picking weight up or pressing it overhead — movements with clear biomechanical endpoints. The yoke carry is different: you're not trying to get the weight somewhere above you, you're trying to move it horizontally as fast as possible while it sits across your upper back pressing down.
That horizontal movement component is what creates the specific technical challenges that make the yoke carry a practiced skill rather than just a strength test:
The yoke swings. Any lateral movement in your stride, any rotation in your torso, any unevenness in your hip drive amplifies through the frame and creates a sway that compounds with each step. A slightly uneven gait pattern that's invisible in your bodyweight sprint produces a dramatically visible yoke sway at 600+ pounds.
The compressed time window is real. Yoke carry events are typically timed over 50 feet. The difference between a fast carry and a slow one at national competition weight is often measured in seconds — seconds that come from stride efficiency, not from raw strength.
Fatigue accumulates differently. The yoke compresses your spine under load while you're moving — a combination of compressive stress and locomotive demand that's unlike any barbell movement. Athletes who haven't specifically adapted to this combination find their technique deteriorating faster than expected as weight increases.
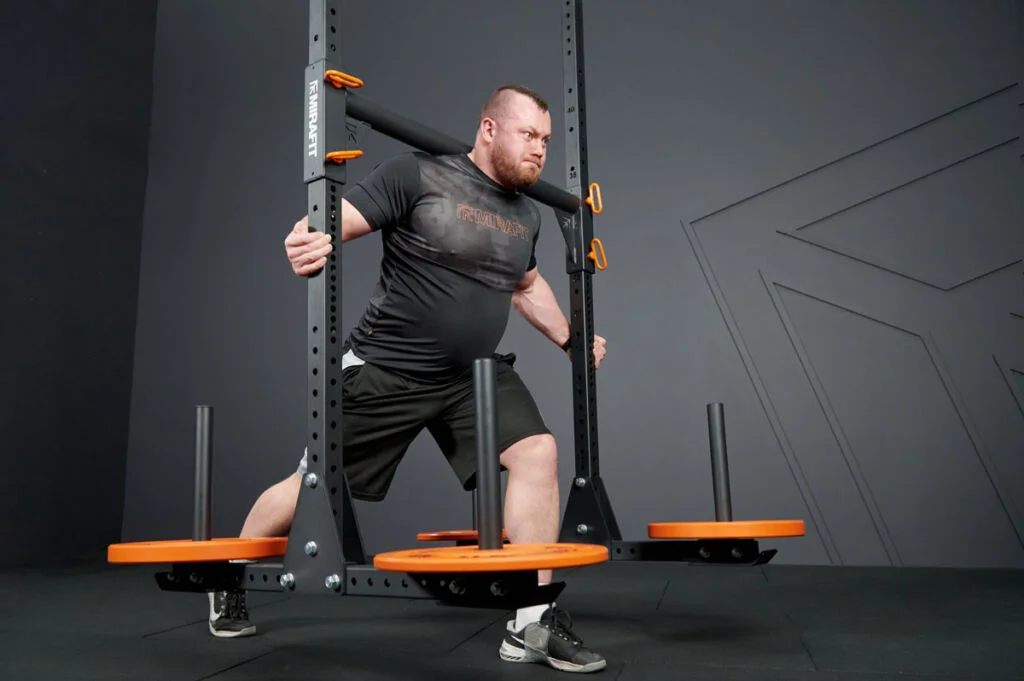
Setup — Getting Under the Yoke Correctly
Height adjustment. The yoke should sit at a height that allows you to get under the cross bar with room to stand without having to excessively bend your knees or tip your torso forward. Most athletes set the yoke so the crossbar sits across the upper traps in a position similar to a high-bar squat — but slightly more customized based on individual proportions.
Too low forces an exaggerated forward lean and limits stride length. Too high makes the initial lift dangerous and instability worse. Practice with a height that allows an upright torso and full extension.
Hand position. Your hands should grip the vertical uprights of the yoke, not the crossbar itself, at a width that allows your elbows to remain slightly bent with the hands positioned at roughly hip height. This position gives you the most control over the frame's lateral movement.
Initial brace before lifting. Before you lift the yoke, establish your full bracing pattern — deep breath into the belly, 360-degree core expansion, upper back pulled tight. The brace must be set before the yoke leaves the rack, not after. A partial brace under a maximum yoke load is a recipe for instability.
The lift. Drive through the floor with both legs simultaneously. The yoke lifts from the rack as your hips and knees extend together. Keep your torso vertical through the lift — any forward lean at lift-off creates momentum that's harder to control through the carry.
Stride Mechanics — How to Walk a Yoke Fast
Short, quick steps beat long strides. The intuition to take big steps to cover ground faster is wrong in yoke carry. Long strides create lateral oscillation in the frame and increase the time each foot spends in the air — both of which destabilize the yoke. Short, quick steps maintain consistent contact with the ground, reduce sway, and allow you to adjust your path more efficiently.
Keep your eyes on a fixed point. Look at the end of the course, not at the yoke or at your feet. A fixed visual target keeps your head position stable, which keeps your torso position stable, which reduces yoke sway. Athletes who watch the yoke or look down during the carry amplify instability through head movement.
Drive straight back with each stride. The force of each foot strike should go directly backward — not outward. Any lateral push in your stride creates lateral movement in the yoke. Think about your foot strike as straight down and back, minimizing any sideways component.
Breathe between steps, not during. For most athletes at competition weight, attempting to breathe mid-stride disrupts the brace and creates instability. Take quick partial breaths between steps if needed, but don't time your breath with your stride cycle in a way that releases your brace.
Dealing With Yoke Sway
Even technically proficient carriers deal with some yoke sway at maximum weight. The question is how to manage it when it appears:
Slow down before you speed up. If the yoke starts swaying significantly, your instinct to power through can amplify the oscillation. Take one or two shorter, controlled steps to let the sway dampen before resuming your race pace.
Use micro-adjustments in hand pressure. Your hands on the uprights give you limited but real ability to damp the sway. A small increase in hand pressure toward the direction of sway can help stabilize the frame without requiring a full stop.
Never fight a sway by leaning into it. Leaning your torso to counteract a yoke sway creates a worse oscillation on the next step. Keep your torso vertical and use stride and hand adjustments instead.
Training Progression for Yoke Carry
Phase 1 — Technique with manageable weight (weeks 1–4)Start with a yoke loaded to roughly 60–70% of what you'll attempt at competition. Focus entirely on stride mechanics, brace consistency, and hand position. Film every set from behind. Look for any asymmetry in your stride pattern or lateral sway that indicates a technique issue.
Phase 2 — Building load (weeks 5–8)Increase weight progressively while maintaining the technique standards established in Phase 1. When technique breaks down, reduce weight and rebuild before adding load again.
Phase 3 — Competition-specific preparation (weeks 9–12)Train at or above competition weight with full race simulation — setting up from rack height, bracing before the lift, completing the full course distance at competition pace. This phase builds the specific nervous system adaptation to maximum load that training at lower percentages doesn't fully develop.
Accessory work: Front-loaded carries (zercher carries, sandbag carries) develop the core stability and locomotive pattern used in yoke carry. Pause squats develop the braced isometric strength needed to stabilize the frame during each stride.
Watch the Yoke Carry Live at Strongman Nationals
The Strongman Corporation Nationals at the North Texas Strength Expo in Mesquite features the yoke carry at national championship weight — competitors who have qualified through the full SC circuit moving maximum loads down the competition course in front of thousands of fans.
Watching the yoke carry live gives you technical reference that no video can fully replicate. See the stride pattern of the fastest carriers. Watch how elite athletes manage yoke sway. Observe the difference in movement quality between athletes whose technique holds at maximum weight and those whose form deteriorates.

See the yoke carry at the national level — live at the North Texas Strength Expo.Tickets at ntxstrengthexpo.com


Find Us On
.svg)

.svg)